
Multimodal markup is a visual editor that allows for easy annotation of all the major elements of multimodal media based on still images. We developed the editor primarily with graphic literature in mind, but it can be used for anything that is comprised of still images and text, e.g. newspapers, magazines, film stills… Given our own focus on comics, what follows deals primarily with that medium.
- Download the editor from our blog
- Unzip the file, then open “ComicEditor.jar”
- It is required that you are running Java on your machine, at least in version Java 1.6.
Here’s an overview of the editor’s layout:
(appearance might vary depending on your operating system)
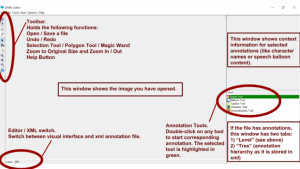
Open an image by clicking “File” –> “Open…”
Your image will then show up in the large window to the left. If you are done annotating, click “Save as…” and write a file name with “.xml” as file extension at the end of the name.
Use “File” –> “Open” as you would when opening an image. If you open an XML file, the editor will ask you to open the source image next.
If your XML file is in the same directory as the source image, the editor will open the image automatically if you open your XML file.
- Choose one of three functions from the toolbar to the left: selection tool, polygon tool, and magic wand.
- Selection tool is used for existing polygons (see 3. for a definition of a polygon)
- Polygon tool is used for creating polygons by connecting vertices
- Magic wand creates a polygon automatically. So far, this works with most panels, speech balloons, captions, and onomatopoeia, but not with visual objects such as characters, background figures, etc.
- Double-click on the annotation tool you want to use (panel, speech balloon, caption, character, onomatopoeia)
- Start clicking on the edge of the element you want to annotate. This creates a vertex – the next click creates another vertex and so on. The area surrounded by vertices is a polygon. The polygons comprise the annotation layer “over” your image. Each polygon should be congruent with its corresponding element.
- You can finish the polygon either by double-clicking or by reselecting any of three cursors. If everything went OK, you’ll be able to see the polygon in the “Tree” tab in the bottom right window
- Fill in relevant data about your annotation in the upper right window (e.g., character name, speech bubble content, relations to other characters in the panel, etc.)
Each color corresponds to an element to tell them apart visually:
Red = Panels
Blue = Speech Balloons
Yellow = Captions
Green = Characters
Orange = Onomatopoeia
As soon as you open a file, the editor will try to detect panel polygons automatically. This is so that users can start annotating all the other elements as parts of the panel in which they appear. The hierarchy of annotations should always be panels –> everything else.
But what if they are wrong?
You can delete any polygon by clicking on the selection tool to the left, then right-click on the polygon, then click on “remove selected object.”
- You can move vertices with the help of the selection tool if you click on them (they should change color from black to blue to indicate that they have been selected).
- You can delete vertices by right-clicking on them with the selection tool.
- You can also delete your own polygons if you right-click on the polygon with the selection tool, then click on “remove selected object.”
- Alternatively, you can edit polygons if you right-click on the polygon with the selection tool, then click on “add vertex.” This adds another vertex to your polygon if you need an additional one. The vertex appears on the edge closest to your click.
The hierarchy in the “tree” tab in the lower right window is helpful for two things:
- indicating which element is part of another element: for example a character is part of a panel
- reading order – in Western comics, standard panel order is from left to right and from top to bottom
The “tree” tab should always have the correct hierarchy and reading order. You can edit the hierarchy with a simple drag-and-drop of the element you want to move. If there’s more than one possible reading order, choose the one that seems most natural to you.
- Speech balloons are exclusively tied to someone or something uttering them – persons, telephones, loudspeakers, animals, etc. If an utterance has a ‘tail’ pointing towards someone or something, it is almost always a speech balloon. The same is also the case for thought balloons.
- A caption is detached from a speaker. Captions are usually boxes indicating a change of place and time (“Meanwhile,” “And Then,” etc.), but they can also contain narration. Captions do not have a tail.
- Onomatopoeia are ‘written sounds’, like “screech,” “boom,” “honk,” and so on.
We usually restrict annotation to characters that are pertinent to the narrative. This includes protagonists, minor characters, and people interacting with pertinent characters. It excludes persons in the background or large groups of people. We recommend that you annotate comics only after having read the story, or a reliable plot summary.
Polygons should not overlap. Annotating two overlapping characters can be solved by annotating as little as possible of the ‘invisible’ part of the object. Polygons can be concave as well as convex, so every shape and form is allowed here.
- Transcribe text into standard spelling, i.e. follow case-sensitive writing, even if the text in the comic is all-caps.
- Transcribe line breaks as they appear in the comic.
- There is currently no feature to annotate whether a text is italicized, bold, changes font or font size etc. So, for the time being, you’ll either have to ignore these typographic elements, or find a solution that suits your needs. Ideas and feedback are welcome!
Elements in a panel should always be subordinate to the panel in the XML “Tree” hierarchy. If an element extends beyond the panel frame, it should still be assigned to one panel only.
To give an example: a speech balloon floating above a panel should be assigned to a character within the panel.
Each window can be resized by clicking on window borders and dragging them.
If you click on another annotation tool, they will reappear.
The performance of the editor depends on the size of your image files and a larger file requires more memory capacity. We found that the editor yields the best results with a horizontal resolution of around 1000-1500px depending on your image format. We will provide tools to rescale XML annotations to your original image size.
If you click on “Options” –> “Language” you can switch between English and German.
If you encounter problems or want to help improve the editor’s functionality, please email Svitlana Zarytska at zarytska@mail.upb.de.
Load More